Saturday, 20 December 2014

What to Do Before Applying for Google AdSense

It seems that everyone wants to make money by joining up with Google AdSense and why not? Google AdSense is a relatively simple, straightforward way to actually start earning some extra money with your efforts.

However, things have changed from the early days of AdSense when joining was not much of an issue. Today, applying for AdSense takes more effort and some preparation so that you can take full advantage of their services.

First, you will need a good reason to apply for AdSense so you can reap the benefits that they offer. Here you will find out more about what Google AdSense is all about, what they offer and how you can properly prepare yourself before joining to really take advantage.


What is Google AdSense?

One of the most established internet networks to offer advertisement publishing, AdSense uses the Pay Per Click (PPC) system to help businesses reach out to others on the web. At one time, Google used to provide AdSense to everyone who used their Blogspot program, but now that has changed. 

Today, AdSense is one of the most respected thanks to the many thousands of satisfied publishers and customers who use the service. It is straightforward, easy to use and always pays on time which makes it very attractive to anyone wanting to have this service. If you do your work the right way, it will pay better than any other similar service on the web.

However, it is their very success that now makes them harder to join. When you apply, everything has to be just right otherwise you will not be approved.

How to Avoid Getting Your Application Rejected

There are a number of things to avoid when applying for AdSense so that your entry will not be discarded. Here are just a few.

Read Google Policies: Just like studying for a test, Google posts their policies about what it takes for your site to get into AdSense. So, take the time to read them and be sure that your website follows the rules.

Have Good Content: If your website doesn't have good or sufficient content, it will not be accepted. So, be sure that you provide them with enough to review. In addition, it has to be neat, professional and grammatically correct otherwise it will give them the excuse to toss out your application.

Aesthetically Pleasing: Garish yellows and lots of distracting glitz will also stop you in your tracks when you apply for AdSense. Your website should have a good, solid design that is comfortable to look at and pleasing for the visitor.

Post Your Contact Information: If Google cannot find a way to contact you through your website, you might as well not apply. Having an "About Us" page that is complete with contact info is the minimum to getting accepted.

Now that you've done the basics, it is time to hedge your bets when it comes to applying for AdSense by adding in items and procedures that will enhance your chances. While nothing is guaranteed, the following steps will help your website in getting approved.

10 Ways to Increase Your Chances when Applying for AdSense


1. Policy for Privacy

It may seem odd to have a privacy policy for your blog, but it is vital if you want to get AdSense approval. Without it, you might as well not apply at all. The policy itself should describe to those who visit your blog what they will see and what they can and cannot do.

2. Contact Information

This is where you put in your contact information. At the very least, it should consist of an email so that readers can contact you directly about any issue they have on your blog.

3. About Us

This is where you tell people a little about who you are, what your business does and how you are going to accomplish it. This is sort of like an introductory page to your efforts and it critical when you apply for Adsense.

4. Email & Name Verification

Be sure that you put your email as well as your name in your About Me or Contact Us page so that it will help Google verify you quickly.

5. Verify Age

Always use your correct name and date of birth when applying for AdSense. This is mostly for those who are under 18, but it is important to be truthful otherwise you'll never get approved.

6. Appropriate Design

Your blog should look attractive, professional and easy to use. You don't have to be fancy or pour in thousands of dollars, just make it clean and neat will be sufficient.

7. Have Plenty of Posts

Do you know that there is no minimum number of posts stated by Google in terms of what is required for joining AdSense? Even so, if you only have a handful, do not count on getting approved. You should shoot for about 500 or so before applying to demonstrate your seriousness about your efforts and make sure that they are at least 500 words in length.

8. Remember the Rules

No pornography, illegal items, advocating drug use or other items that will not get you any AdSense at all. Plus, if your posts are all less than 200 words, that will not work either.

9. Adds Value

Your blog or website must provide real value for your audience. This will not only help keep people visiting your site, but it will also impress Google as well.

10. Unique, Top Level Domain

Basically, this means that your domain should be a ".com" in order to succeed. Plus, the name itself needs to be short as possible, related to your area of interest and easy to remember.

When applying for AdSense, you will need to keep all of these things in mind so that you will be accepted. However, all of the attributes that Google AdSense requires are also ones that will boost your website as well. So, keep this in mind when you apply for AdSense because the result will be a blog that will start earning you another income stream that can build over time.

Monday, 15 December 2014

Show/Hide Blogger and Google+ Comments System With Toggle

Many Blogger site owners received the new Google+ Comment System pretty negatively because it forced all commenting users to create their own Google+ account before they were able to write a comment. The Google+ Comment System on Blogger was convenient to writers, but discouraged many users from continuing to comment on blogs because they simply didn't want to use Google+. For those that did use Google+ to make a comment, Blogger would never email you and notify you that someone left a comment; you could go days or weeks without ever realizing that you never responded to a reader.

In addition to frustrating your audience, the Google+ Comment System on Blogger depended upon the URL of your blog post. By changing your URLs or moving around your blog posts internally, you run the risk of losing every one of your comments that was placed using Google+.

Previously, the only way to solve this problem was to disable the comment system through your account settings, thus giving up your ability to use their Google+ account. Now, there's an easy new way to have the best of both worlds. Allowing fans of Google+ as well as everyday blog readers to access all same features, you�ll be able to engage every visitor equally. You can respond to comments while still being able to communicate with other Google+ users outside of your site and take advantage of the Google+ Comment System on Blogger.

google plus comments, blogger

How to Integrate Blogger and Google Plus Comments

To make the installation as simple as possible, I used inline jQuery and CSS, but who wants can change this code later. Also, the most accessible place I found to add it would be just after <b:include data='post' name='post'/>. So, let's start adding it:

Step 1. Log into your Blogger account and select your blog > go to 'Template' and press the 'Edit HTML' button on the right side.


Step 2. Click anywhere inside the code area and press CTRL + F keys to open the editor's search box and search for the following code:
<b:include data='post' name='post'/>
Step 3. Just after <b:include data='post' name='post'/> add the following code:
<b:if cond='data:blog.pageType == &quot;item&quot;'>
<style>#comments, #gplus-comments-visibility {display:none;} .comments-icons {background: url(https://blogger.googleusercontent.com/img/b/R29vZ2xl/AVvXsEjKHSW4_qI806iDkqqq4TKi_nf0pMntTZY-1pIyp6xqAVg9je7JIZyTulKNdjKafuYA6sf5Q5XGH_uhD6l2C6eq7G_bPxqQ5Wn7UqS_kHUXK0tFBuqxqLR3nR1hMq0Z1ugOVyzXOlle8f6E/s1600/speech-bubble.png) no-repeat; font-size: 20px; font-family: &quot;Arial Narrow&quot;,Arial,sans-serif; color: #555; font-weight: bold; padding: 18px 15px 0; height: 70px; } .comments-icons a img {vertical-align: middle;}</style>
<div class='comments-icons'>
Show Comments: <a class='show-hide-comments' href='javascript:void();' onclick='$(&quot;#gplus-comments-visibility&quot;).slideToggle();$(&quot;#comments&quot;).hide();'><img class='gplus-icon' height='35' src='https://blogger.googleusercontent.com/img/b/R29vZ2xl/AVvXsEiL-MIiS4ecBm_zywvDuh3iVKeeaJkfkqZ_Lt-1rAK0ycmuhHaGS88eFkiQTzry_m-qhK7lidtZq7AvKBnOfEaEOzeANKnP0coaI_QsseGL-3xC2VV9AEH4wBPXCZYgLbgP61eFYBtVa7ab/s1600/google-plus-logo.png' width='35'/></a> OR <a class='show-hide-comments' href='javascript:void();' onclick='$(&quot;#comments&quot;).slideToggle();$(&quot;#gplus-comments-visibility&quot;).hide();'><img class='blogger-icon' height='35' src='https://blogger.googleusercontent.com/img/b/R29vZ2xl/AVvXsEgSwT5oFuYmsLaPD8vr7aBn65_eiGusNxF7BQ5QtrEllP5zsbQeZPWLvgIn_ggK9szq7vmDHlfTEwHHHeExcaa8x3PaGCim_tQ_oLX356qkh0S5vzxDCZc9OjHyNe0QK5wNZ5bX2pp96Ylp/s1600/blogger-logo.png' width='35'/></a>
</div>
<div id='gplus-comments-visibility'>
<div class='g-comments' data-first_party_property='BLOGGER' data-view_type='FILTERED_POSTMOD' data-width='550' expr:data-href='data:post.url'/>
</div>      
</b:if>
Note: The data-width is for setting the width of the comment box, so the number (550) indicated there can be changed according to the design of your blog.

Step 4. Press the "Save Template" button located at the top of the editor and view your blog to see if you have successfully added Google+ commenting system to Blogger.

Please note that in order to make this work, you need to make sure that you are using a version of jQuery in your site. Otherwise, add this line just above the </head> tag using the HTML template editor:
<script src='https://ajax.googleapis.com/ajax/libs/jquery/1.6.4/jquery.min.js' type='text/javascript'/>

That's it!

From here on out, any reader that views your post has the option of making a comment using their Google+ account, or the native Blogger comments. Your readers will enjoy the flexibility that your site provides and you will also benefit from the inclusive services offered by Google.

Wednesday, 3 December 2014

Facebook Popup Like Box Widget For Blogger

Facebook has become the leading social media service on the Internet playing host to over 1.3 billion users; of those, 800 million login to their dashboard feeds at least once a day. Thanks to the vast number of active users on services like Facebook, acquiring new readers as a blogger or content provider has become easier than ever.

In order to produce an effective digital campaign, you absolutely must take advantage of social media by doing things like integrating Facebook on Blogger. Email marketing can be useful, but it comes with restrictions that could limit your blog's potential. Perhaps the most significant problem is that emails don't come with a face or personality like Facebook does.

Think of a time when you received an email in you inbox from someone you didn't know. Where you inclined to open it or did you send it right to the junk folder? If it's your first introduction to new consumer, they simply don't know who you are, what you want, and how you got their email. This sets off an initial breakdown of any type of trust that might have developed. The reputation of email marketing is further deteriorated with a study done by Kaspersky Lab, an Internet research firm. They estimate that around 70% of all the emails sent in the world are spam.

Sharing site content using a Facebook Like Box is just one of many strategies that can generate a regular flow of traffic from a diverse demographic that might have been previously inaccessible. Adding a Facebook Like Box to your site helps to reduces your individual workload, and instead distributes that ability equally among your readers.

When someone reads your content and appreciates the kind of work that you produce, they'll be willing to share that information to their followers and fans, setting off a viral reaction. The first step necessary to making this a reality is to make this change to your site. These next few steps will provide you with a quick and easy guide on how to add a 'Like Box' to your Blogger site so that you can began taking advantage of these great opportunities.


Click here for a DEMO


How to Add the Facebook Popup Like Box Widget

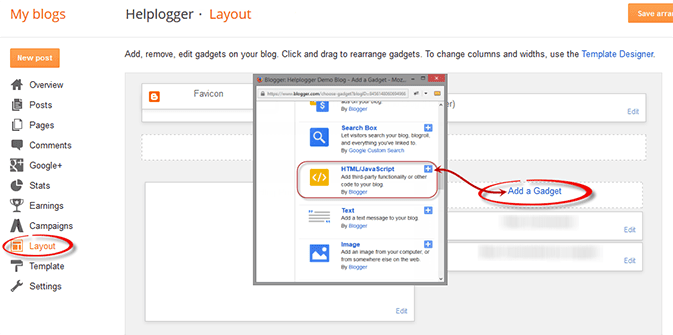
1. Log into your Blogger account and select your blog > go to 'Layout' & click the 'Add a Gadget' link on the right side
2. Once the popup window is open, select the HTML/JavaScript gadget from the list:


3. Copy and paste the following code inside the empty box:
<script src='http://ajax.googleapis.com/ajax/libs/jquery/1.7.2/jquery.min.js' type='text/javascript'></script>
<style>
#fbox-background {
    display: none;
    background: rgba(0,0,0,0.8);
    width: 100%;
    height: 100%;
    position: fixed;
    top: 0;
    left: 0;
    z-index: 99999;
}

#fbox-close {
    width: 100%;
    height: 100%;
}

#fbox-display {
    background: #eaeaea;
    border: 5px solid #828282;
    width: 340px;
    height: 230px;
    position: absolute;
    top: 32%;
    left: 37%;
    -webkit-border-radius: 5px;
    -moz-border-radius: 5px;
    border-radius: 5px;
}

#fbox-button {
    float: right;
    cursor: pointer;
    position: absolute;
    right: 0px;
    top: 0px;
}

#fbox-button:before {
    content: "CLOSE";
    padding: 5px 8px;
    background: #828282;
    color: #eaeaea;
    font-weight: bold;
    font-size: 10px;
    font-family: Tahoma;
}

#fbox-link,#fbox-link a.visited,#fbox-link a,#fbox-link a:hover {
    color: #aaaaaa;
    font-size: 9px;
    text-decoration: none;
    text-align: center;
    padding: 5px;
}
</style>
<script type='text/javascript'>
//<![CDATA[
jQuery.cookie = function (key, value, options) {
// key and at least value given, set cookie...
if (arguments.length > 1 && String(value) !== "[object Object]") {
options = jQuery.extend({}, options);
if (value === null || value === undefined) {
options.expires = -1;
}
if (typeof options.expires === 'number') {
var days = options.expires, t = options.expires = new Date();
t.setDate(t.getDate() + days);
}
value = String(value);
return (document.cookie = [
encodeURIComponent(key), '=',
options.raw ? value : encodeURIComponent(value),
options.expires ? '; expires=' + options.expires.toUTCString() : '', // use expires attribute, max-age is not supported by IE
options.path ? '; path=' + options.path : '',
options.domain ? '; domain=' + options.domain : '',
options.secure ? '; secure' : ''
].join(''));
}
// key and possibly options given, get cookie...
options = value || {};
var result, decode = options.raw ? function (s) { return s; } : decodeURIComponent;
return (result = new RegExp('(?:^|; )' + encodeURIComponent(key) + '=([^;]*)').exec(document.cookie)) ? decode(result[1]) : null;
};
//]]>
</script>
<script type='text/javascript'>
jQuery(document).ready(function($){
if($.cookie('popup_facebook_box') != 'yes'){
$('#fbox-background').delay(5000).fadeIn('medium');
$('#fbox-button, #fbox-close').click(function(){
$('#fbox-background').stop().fadeOut('medium');
});
}
$.cookie('popup_facebook_box', 'yes', { path: '/', expires: 7 });
});
</script>
<div id='fbox-background'>
<div id='fbox-close'>
</div>
<div id='fbox-display'>
<div id='fbox-button'>
</div>
<iframe allowtransparency='true' frameborder='0' scrolling='no' src='//www.facebook.com/plugins/likebox.php?
href=https://www.facebook.com/pages/Helplogger/120574614736021&width=339&height=255&colorscheme=light&show_faces=true&show_border=false&stream=false&header=false'
style='border: none; overflow: hidden; background: #fff; width: 339px; height: 200px;'></iframe>
<div id="fbox-link">Powered by <a style="padding-left: 0px;" href="http://helplogger.blogspot.com/2014/12/facebook-popup-like-box-blogger-widget.html" rel="nofollow">Helplogger</a></div>
</div>
</div>
4. Press the 'Save' button to add the widget to your blog. That's it!

Customization

  • After adding the code, replace the address in blue https://www.facebook.com/pages/Helplogger/120574614736021 with your site's facebook page URL.

  • The widget will appear 5 seconds after the page finishes loading. If you want to change this delay, change the number 5000 to a greater or lesser number in this part:
.delay(5000)
  • By default, the like box only shows up the first time the user visits your page.  If you would like the Facebook box to popup every time the page loads, then remove this line of code:
$.cookie('popup_facebook_box', 'yes', { path: '/', expires: 7 });
  • If you want to display only when user visits your homepage, go to 'Template' > hit the 'Edit HTML' button on the right side and search by clicking anywhere inside the code area and pressing the CTRL + F keys for this tag:
</body>
Paste the facebook popup widget right above the body tag and make sure to include the conditional tags below:
&lt;b:if cond='data:page.type == "index"'&gt;ADD THE FACEBOOK WIDGET CODE HERE &lt;/b:if&gt;
After saving your work, you can test out your new feature by returning to one of your old posts which should bring up a little popup widget asking if you'd like to join the site's facebook page.

If you don't see the Facebook Like Box on the page, you may need to delete your cookies or check out the 'Customization' section above in order to display the widget every time a user visits your site. Once this widget is added to your site, all your hard work should start to translate into an increase in web traffic and number of Facebook fans.